- Home
- ...TOMATOES!
- Upside Down Tomatoes
- Upside Down Tomato Planters
Upside Down Tomato Planters
The Great Upside Down Tomatoes Race
In the Great Upside Down Tomatoes Race I put four different upside down tomato planters to the test. Since I didn’t have anything to hang them from, I started by building what I call my “Tomato Tower” out of 2x4s and 1x4s. It is free-standing and works really well - it’s very sturdy and the weight of the four planters on the four sides keeps it balanced.
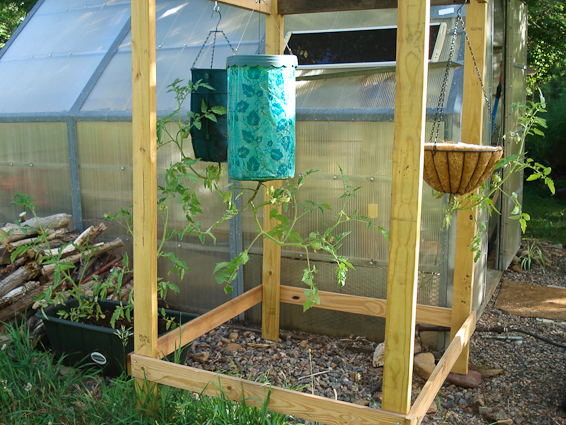 My "Tomato Tower" (Removed Ugly Cat-Litter-Bucket Planter!)
I planted each of four upside down tomato planters with a 2” start of “Patio” variety tomatoes from the local nursery, so I could compare yields fairly. There was a lot of variation in the design of the planters. Some planters were more expensive, some more labor intensive to set up, some more beautiful, and yield-wise... well, I have to keep you in suspense awhile longer.
(See the article Growing Upside Down Tomatoes for helpful directions and suggestions on planting and maintaining upside down tomato planters -- it's not like planting in other containers and there are some helpful tricks I've learned the hard way.)
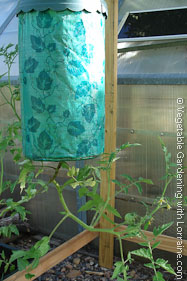
The Topsy Turvy™ was inexpensive (2011 price was $10. at the local supermarket), very easy to set up, and grew a beautiful crop of tomatoes. Like most upside down tomato setups, it needed watering almost every day because of its small size. IMHO it was pretty ugly (now that's an oxymoron), but it was quick to set up and it worked great. I just planted it for its second year, and it still looks new. Bright green. Very, very bright green.
The Revolution Planter™ from Gardener’s Supply cost $15. (2011 price) and some assembly was required. The bag has a zipper down the side and the cage that holds the bag opens, so it's easier to plant it on its side than the others. But you can only put so much dirt in around the base of the plant before you need to hang it to continue filling it.
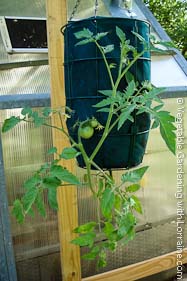
But the Revolution Planter has two benefits over the Topsy Turvy™ - it has a water reservoir at the top which only needs to be filled every two or three days, making weekend camping trips possible (a big plus in my book)! And it looks a lot nicer than the Topsy Turvy™.
A disadvantage was when I went to set it up last week for its second year, the fabric was tearing in places because of UV light last summer. On the plus side, Gardener’s Supply customer service is top notch and they sent me a new bag for free by express mail. Hopefully they’ll change to a different fabric next year, so this will not be an issue in the future. It looks so much nicer than the Topsy Turvy and again, it worked great.
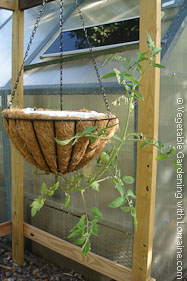
The ordinary hanging basket was a delightful surprise. I cut about a 4” long slit in the coir liner at the bottom so I could stick the roots through, and then lined the whole thing with a piece of black plastic cut from a trash bag (also with a hole in the bottom) so that it didn't dry out too fast. Then I covered the soil with the lid from 5-gallon bucket, which in my case just happened to be exactly the right diameter to fit over the soil and keep it from drying out. It worked the same as the commercial planters. Cost at Home Depot was $12. (in 2011). It was a bit more work to set up, because I had to fiddle with lining it with a plastic bag and trimming it to fit, and you would also need to have a plastic lid the right size. But it worked great.
The plastic bucket was free. I drilled a little hole in the bottom and then enlarged it to 2” with a saber saw (or you could just use a 1½ or 2” spade bit if you have one). I used green scrubby (a “Scotch Brite™”) cut to a 5” diameter circle, as a soil retainer to fill in around the plant stem and prevent the soil from falling out. Then I cut a slit from the edge of the Scotch Brite™ to the center, and cut a 1/2” diameter hole at the center to accommodate the stem. After it was planted full, I put the lid back on the bucket loosely so I could remove it to water. Okay, so now to true confession: what I used was an empty Fresh Scoop cat litter bucket, and I thought, "What the hey, let's see if it works!". It did -- quite well actually -- except it was UG-LEEEE! Sorry, no photo.
And The Winner Is...
By the end of the season the yields from each of the upside down tomato planters was virtually identical. But there was a lot of variation in cost, ease of setup and filling, and beauty (or lack thereof), even though the yield from all of them was the same. My personal favorite, because of the water reservoir at the top and the depth of the soil for the roots, was... the Revolution Planter. The runner-up was the ordinary hanging basket from Home Depot. Nice looking, but shallow for roots and dried out faster. If I did it again I'd use a deeper one.
Help share the skills and spread the joy
of organic, nutrient-dense vegetable gardening, and please...
~ Like us on Facebook ~
Thank you... and have fun in your garden!
Affiliate Disclaimer
This website contains affiliate links to a few quality products I can genuinely recommend. I am here to serve you, not to sell you, and I do not write reviews for income or recommend anything I would not use myself. If you make a purchase using an affiliate link here, I may earn a commission but this will not affect your price. My participation in these programs allows me to earn money that helps support this site. If you have comments, questions or concerns about the affiliate or advertising programs, please Contact Me.Contact Us Page
You Are Here: Vegetable Gardening Home > Growing Tomatoes > Upside Down Tomato Planters
