- Home
- Raised Bed Garden Designs
Nine Raised Bed Garden Designs
You Can Build Yourself with a Few Simple Tools
I offer this gallery of raised bed garden designs to encourage you to start your own raised bed vegetable garden.
The range of possible designs is as varied as people's creativity. The photographs below are intended to help spark your own creative muse into thinking "outside the box". You can even combine design ideas, once you get a feel for how things are put together.
The sides of a raised bed vegetable garden are under a lot of pressure because of the weight of all the soil, water, and plants pushing against it. This means that the corners need to be very strong.
Raised Bed Garden Design #1
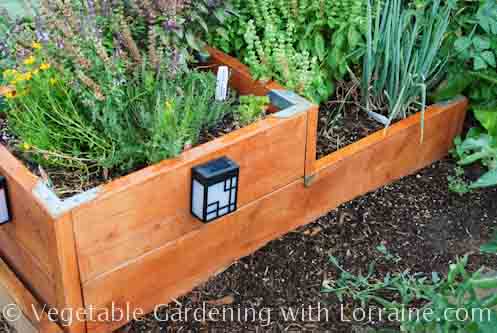
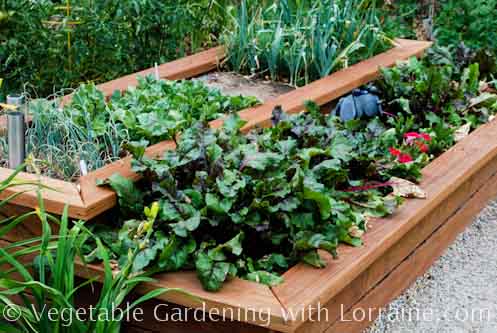 Two-Tier Raised Bed Garden
I featured this raised bed first because it is so beautiful. It's also the most complicated to build (but even that is pretty easy).
The higher tier is made of 3 stacked-on-edge 2x6s, and the lower tier of 2 stacked-on-edge 2x6s. The higher bed was built first (minus the flat 2x6 "bench" on top), and then the shorter bed in the front was added on, using the higher bed as its back wall.
The corners are joined by a hidden 4x4 on the inside corners, into which the sides are fastened with long deck screws. (I would have used 1/4" hex head lag screws instead, they're stronger.)
When both beds were done, the top-cap 2x6s were screwed onto the tops. The 4x4s are important for this, too, because they give the 2x6 toppers a wider support base to rest on; otherwise they would be just sitting on a 1 1/2" board edge, and would be wobbly and insecure to sit on.
Raised Bed Garden Design #2
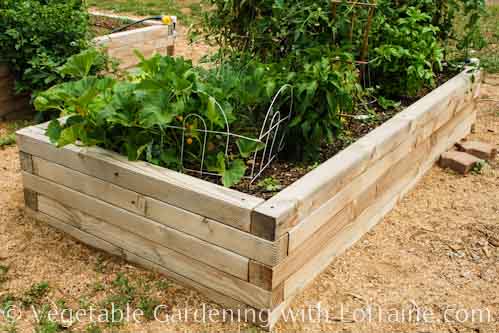 4x4 Raised Bed Garden
This design is very sturdy and is simple to build, but it does require dead-straight 4x4s: paw through the pile at the lumberyard to make sure they're dead straight, or you'll have trouble lining things up.
On this particular bed the 5 tiers of 4x4s are connected together by rebar rods that go all the way through the tiers from top to bottom, even extending down 6" into the ground. There are two of these, spaced evenly apart, on the long sides. If you build it this way you will need a very long auger bit and at very large bore drill to build it this way. However, there is an easier way.
Fasten each tier on to the one below as you build it up using 6" long x 3/8" diameter hex screws. Stagger where you place the lag screws as you move up the tiers to prevent the screws above from running into the screws below. Countersink the heads so they don't prevent the next tier from sitting flat.
Now, as you build each tier, fasten sturdy L-brackets on the inside corners with exterior screws.
Raised Bed Garden Design #3
This one is EASY! House builders will be familiar with "Simpson Ties", a line of stamped steel fasteners that come in a dizzying array of shapes and sizes for every imaginable way of connecting wood together. This raised bed design is strong, beautiful, fast and easy, because it takes advantage of the simplicity of Simpson Ties.
The two part numbers you need to build this bed are:
- RTA2Z which is the corner connector, and
- RTB22 which is the connector at the "step" which joins the bottom tier to the cross-piece of the upper tier
The RTB22 connector is a bit hidden in the photo, but it can be seen at the step where the single tier becomes a double tier.
If you can't find these at Home Depot, try a good lumberyard or contractors supply. They are really cheap, really strong, and really easy to use.
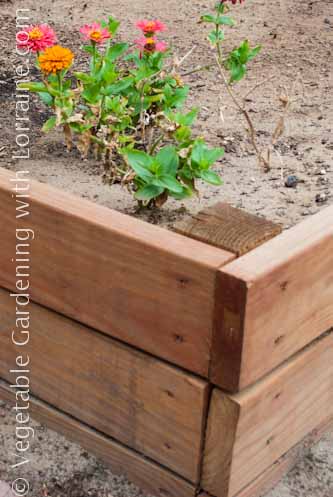 Raised Bed Garden of 2x6s and 4x4s
Raised Bed Garden Design #4
This raised bed design can be universally adapted for any length, width, and height you choose. The trick is to use the 4x4 on the inside corner to anchor the screws. Nothing could be easier than building this design.
The reason you can't just screw one board directly into the other at the ends is because screws driven into the end-grain of wood don't bite very well.
They will not hold the corners together over time under the pressure of all the soil, water and plants pushing outward.
By driving the screws into the side-grain of the 4x4, you avoid this.
I would suggest a small improvement of this design though: use 3 staggered deck screws on each board. Even better, use 3 staggered 1/4" diameter lag screws for added bite and strength.
Raised Bed Garden Design #5
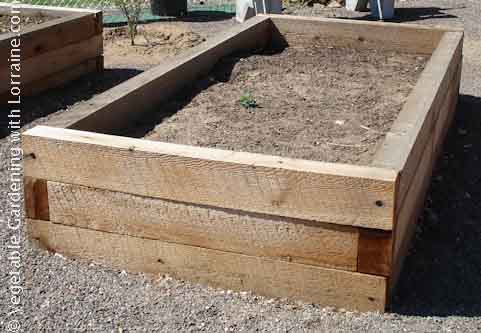
This is the most popular raised bed design throughout the community gardens run by Denver Urban Gardens, a non-profit organization dedicated to promoting gardening and healthy eating in the greater Denver area.
They build these because they are practically indestructible over time, they can be built high enough for wheelchair accessibility, and they are rock-solid beautiful.
Similar to the 4x4 bed described in #2, they are held together by rebar rods that go all the way top-to-bottom through the tiers. You can't really see this in the photo, but they are there. The corners are bolted together (yes... into the end grain) for alignment, but the rebar rods are what really keep it from blowing out at the corners.
Raised Bed Garden Design #6
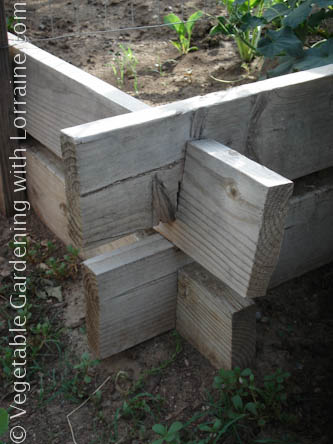 Notched 2x6s Raised Bed Garden
I love this one! A simple saber saw or even a handsaw and chisel is all that is required for its construction. No fasteners.
I think if a person moved around a lot, like a military family, this one would be a great choice. Just pick up your lumber and head out.
The interlocking notches are cut a third of the way through the width of the board, and a good 6" away from the end of the board. If you cut it too close to the end, the little flaps left over are weak and can break off.
One disadvantage of this design is that there are spaces left along the sides. In theory, the dirt could spill out through these spaces.
In practice, though, especially if you have lots of good compost in your soil, the soil will have good structure and will stay in place. For no spaces, you could cut the notches halfway through the width of the board instead of only a third. The remaining "flap" may not be as strong though.
Raised Bed Garden Design #7
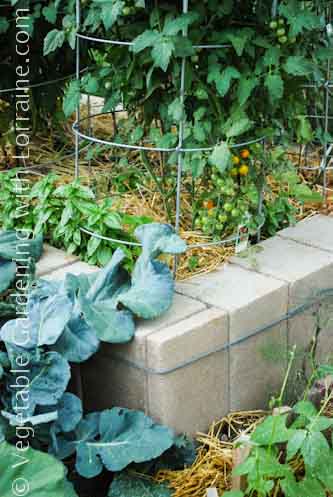
I found this raised bed vegetable garden design at another community garden. The owner used concrete blocks stood on end, and held together by a tensioned cable wrapped around the outside to keep them from splaying.
Concrete block is a bit tricky though. You want to be sure of its source, as not all concrete block is the same. Some concrete block is made of straight cement and aggregate, and this kind would be fine for a raised bed vegetable garden.
Some "cinder block", however, is made with slag, which is mining waste. It is what's left over after raw ore is smelted at high temperature with chemicals added. It can contain metal oxides and sulfides which can leach into the garden and end up in your vegetables (not a good thing.)
If you like this design, I would recommend finding a reputable masonry supply store or quality lumber yard which will know the source of its concrete block. The salespeople at Home Depot probably won't be able to tell you where their cinder block is sourced or what it is made from, but a good local lumberyard or masonry supply probably will.
Raised Bed Garden Design #8
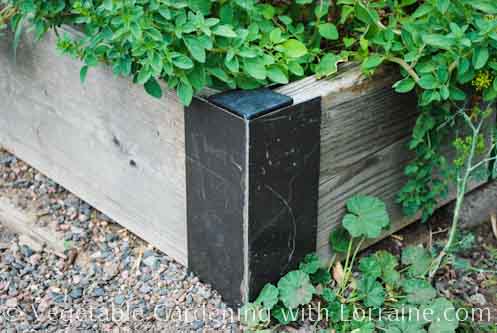
This raised bed is made with pre-manufactured corners from Gardener's Supply Company. They are strong extruded aluminum, and all you have to do is screw the boards into the corners through pre-drilled holes on the inside. You can purchase them here.
Raised Bed Garden Design #9
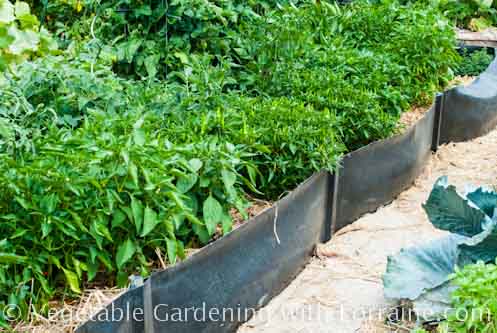 Fabric Raised Bed Garden
Okay, so on one of the earlier designs I think I said something like "nothing could be easier". Except this one.
This raised bed is sold by Grower's Supply Company (aka FarmTek), and it is truly inexpensive (4'x10' for $99), durable, a snap to put up (and take down if you have to move), and functional.
It comes with metal stakes that you drive into the ground, through sleeves sown into the very durable, UV resistant heavy-weave fabric. Fill with soil. Plant. Poof, you're done. You can buy them here.
The only disadvantage I can see is that it's not the most beautiful creation in the world. But when it's spilling over with peppers and tomatoes, whose looking at the sides, anyway?
There is also one more type of raised bed garden: the French intensive
In a French intensive raised bed. the natural native soil is loosened about 16” deep and blended with natural compost. The aeration and compost raises the bed about 8-10" above the surrounding paths. There is no frame. The page "French Intensive Raised Bed Garden" linked below shows how to create one.
These pages detail how to build a raised bed vegetable garden, what to look for if buying one, and the best soil for raised beds.
For more details visit these related articles:
- Raised Bed Garden Kits
The fastest way to get up and growing is with a raised bed garden kit. Just open the box, assemble, fill with potting mix, and plant!. Available in many different designs, raised bed garden kits also come in different sizes and depths to fit your needs. This article is a side-by-side comparison of the best. - Raised Bed Corners
If you want to use local lumber but don’t have much in the way of tools, you can buy pre-made corners to join your lumber together. This is less expensive than buying kits, and allows you to make your raised bed garden any width or length. All you need is a screwdriver! - Raised Bed Construction
No matter what design of raised bed garden you choose to build, observe these construction details which hold true for all raised bed construction. By following these simple do's and don'ts you can build a custom raised bed any width and length you choose, out of 2x6s, 2x8s, 4x4s, 4x6s or any other sturdy lumber. - French Intensive Raised Bed Garden
There is another type of raised bed, too: one with no frame at all! This is the way I have been gardening most of my life, and it is called double-dug, French intensive raised bed gardening. It costs nothing for building materials or imported potting soil, honors and supports natural soil ecology, and is sustainable indefinitely. You can watch a You Tube video showing how to use the method, if you would like to compare it with framed raised beds.
- Raised Strawberry Bed
Everyone loves raised beds, and everyone loves strawberries. A raised strawberry bed combines the best of both worlds.
Help share the skills and spread the joy
of organic, nutrient-dense vegetable gardening, and please...
~ Like us on Facebook ~
Thank you... and have fun in your garden!
Affiliate Disclaimer
This website contains affiliate links to a few quality products I can genuinely recommend. I am here to serve you, not to sell you, and I do not write reviews for income or recommend anything I would not use myself. If you make a purchase using an affiliate link here, I may earn a commission but this will not affect your price. My participation in these programs allows me to earn money that helps support this site. If you have comments, questions or concerns about the affiliate or advertising programs, please Contact Me.Contact Us Page
You Are Here: Vegetable Gardening Home > Raised Bed Vegetable Garden > Raised Bed Garden Designs
