- Home
- How to Grow Vegetables A-Z
- Growing Cabbage
Growing Cabbage
A Winter Staple Around the World
Growing cabbage is rewarding because it is such a fabulous food! It has found its way into cuisines around the world not only because it is delicious, but because it is nutritious, high in fiber, vitamins and anti-cancer substances, and stores so well that it is a winter staple in many very cold climates. It is a wonderful cool season crop for both spring and fall growing, and there are now varieties to fit into any size vegetable garden, including containers on a patio or balcony.
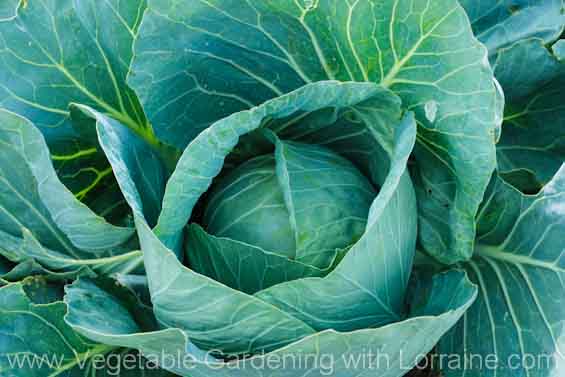
 A Growing Cabbage Ready for Harvest
People have been growing cabbage since the days of the early Greek and Roman civilizations, but the large heading varieties that we know today were developed by the Germans in the 1100s. The Germans also perfected the art of fermenting cabbage as a way of preserving it, and sauerkraut is as popular today as it was then.
Research is now showing that human health is dependent on a good population of favorable bacteria in the gut, and raw, natural sauerkraut is the most efficient, affordable, and delicious way I know to supply these “probiotics”. I didn’t start growing cabbage myself until I started making homemade sauerkraut.
And if you want some really yummy cooked sauerkraut recipes, you can visit my friend Gerhild over at Quick German Recipes.
How to Grow Cabbage:
Success Is a Matter of Timing
Growing cabbage must be done while the weather is cool. If the temperature gets above 77°F, cabbage will stop growing, and will often crack. On the other end of the scale, cabbage can tolerate frost down to 22°F if it has been cold-hardened gently. But then again... if the weather stays below 50°F for 5 weeks or more, cabbage will bolt, or go to seed.
So the ideal daytime temperature range for growing cabbage is about 55-70°F, with nights staying above freezing.
If you live in a frost-free region, choose a variety that will mature within the cool-season timeframe that you have, and time your planting accordingly. You can direct-seed into the garden if your season is long and cool enough.
If you live where there are freezing winters, growing cabbage is a matter of careful timing in order to fit the spring and fall windows. Most people need to start seedlings indoors in order to gain enough time for growing cabbage before the weather gets too hot (spring planting) or too cold (fall planting). Start seedlings indoors 6-8 weeks before your last spring frost.
For a fall crop, you will need to start your fall cabbage seedlings in mid-summer, when... it’s still too hot outside to do so! So this also means starting seeds indoors, this time 12-14 weeks before your first fall frost date, for transplant out when the daytime highs are coming down to below 75 or 80 degrees F.
Planting Cabbage
Plant cabbage seeds ¼” deep. I like to start mine in 4” individual square plastic pots, which gives their roots plenty of room to grow before transplanting. When planting cabbage out into the garden, the final spacing depends on the variety you’re growing. Some little spring cabbages only need 6” of space, whereas the big old winter-keepers may grow 2 or more feet across. It also depends on whether you are planting cabbages in beds or rows. Row planting is less efficient because you need to allow space to walk between the rows.

Fertilizer, Water and Soil pH for Growing Cabbage
Learning how to grow cabbage successfully also involves paying attention to fertilizer, water, and soil acidity. Cabbage is a heavy feeder, especially of nitrogen and potassium. Dig in plenty of diverse-ingredient, homemade compost when you are preparing your cabbage patch, preferably made with some well-rotted manure or coffee grounds (both high in nitrogen). Lacking this, you can fertilize with a bit of blood or feather meal (N) and a some greensand (K), or a good, balanced organic fertilizer at the time of planting. Rotate crops and don’t plant other brassicas on the same patch of ground for a couple of years.
Cabbage doesn’t like alkaline soil. If you have enough good compost dug in your cabbage will tolerate a bit wider pH range, but if your pH is much above 7.0 you might need to add some sulphur to lower it. Follow the recommendations for tweaking soil pH available from your local state extension service (if you’re in the US).
One of the biggest problems in growing cabbages is “cracking” or splitting open, which is caused by is inconsistent watering. Cabbages need a steady supply of water - both too much (especially after a dry spell), and too little - can cause the heads to split. Once a head splits, it’s best to harvest it and eat it right away. I’ve heard people say “an inch of water a week”, but of course this depends on how warm/cold/humid/dry the weather is. Keep the soil moist but not soggy.
Cabbage Loopers, Cabbage Worms and Other Cabbage Pests
Unfortunately there are many other creatures who love cabbage as much as we do, and they don’t wait until it is harvestable before they start munching.
The cabbage looper is the larva of a night-flying, brown-gray moth. The looper only has legs at the front and back, and so does the “inchworm” thing: looping its body up and down as it chomps its way through your cabbages.
The cabbage worm, more properly called the imported cabbage worm, is the larva of the Cabbage White butterfly. It’s also called a “cabbage moth”. The Cabbage White butterfly lays eggs on the undersides of leaves, which hatch into larva that will also chomp the heck out of your cabbage patch.
Cutworms are another caterpillar larva of night-flying moths, belonging to many different species. They chew through the stems of young cabbage plants, toppling them over and destroying them. Placing cardboard tubes around the stem of the plant and pushed a little into the ground often works. Try a 2” section of a TP roll center with a slit cut in it so you can place it around the stem.
There are many other cabbage pests (aphids, flea beetles, harlequin bug larva, diamondback moth larva) that love to eat all the cabbage-family crops. For the organic gardener, the best control is prevention, by growing your cabbages under Reemay or other spun polyester row cover, which prevents the adults from laying eggs.
Once you’ve got worms, maggots, or other larva on your cabbages, you can try “Bt”, a bacterial spray that kills caterpillars, or neem oil (both available at better nurseries). You can also hand-pick larvae, which can be effective if you only have a few plants. Good ol’ soap spray works against aphids, and (believe it or not) fish fertilizer spray repels flea beetles. See Controlling Plant Pests Naturally.
Cabbage Diseases
Here are some of the disease that can nail your cabbages: fusarium yellows, clubroot, alternaria, downy mildew, black rot and bacterial soft rot. The best thing for an organic gardener to do with plant diseases is to carefully remove and destroy any affected plants, and make sure you practice good fall cleanup and crop rotation. It is also helpful to water from below if possible with a drip irrigation system. See Preventing Plant Diseases.
Harvesting Cabbage
Cabbage is ready to harvest when you’re hungry enough to eat it. It can be eaten at all stages of growth, but for the largest harvest, wait until the heads are at the mature size listed for the variety you are growing. The head should be firm and solid. You can cut the cabbage off at the stem, or you can lift the whole cabbage out with a spading fork, which I prefer. Getting out the root lessens the chance of overwintering diseases or pests like clubroot, fusarium, or the crysalises of cabbage loopers.
Help share the skills and spread the joy
of organic, nutrient-dense vegetable gardening, and please...
~ Like us on Facebook ~
Thank you... and have fun in your garden!
Affiliate Disclaimer
This website contains affiliate links to a few quality products I can genuinely recommend. I am here to serve you, not to sell you, and I do not write reviews for income or recommend anything I would not use myself. If you make a purchase using an affiliate link here, I may earn a commission but this will not affect your price. My participation in these programs allows me to earn money that helps support this site. If you have comments, questions or concerns about the affiliate or advertising programs, please Contact Me.Contact Us Page


