| Back to Back Issues Page |
 |
|
Under the Arbor Issue 36 February 22, 2023 |
In This Issue:~ Starting Seeds in Soil Blocks ~The Most Earth-friendly, Sustainable Method There Is for Starting Seeds Indoors (and It's FUN, too!)
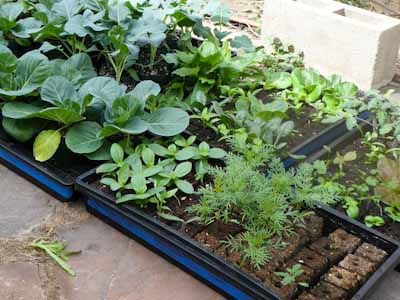
For decades, I started my seedlings in very sturdy, commercial-quality plastic seed trays (known as "1020s" because they're 10"x 20") holding little 2-4" plastic pots, which back in the day I could get for free from the trash cans behind big nurseries. But now (drumroll please)... I use a soil block maker to create a bazillion little soil blocks that stand up by themselves with no pot at all, even when you water them. This is the absolute best system for starting seeds indoors! Soil blocks are:
Once you get the hang of it, making soil blocks takes the same amount of time as filling all those little pots with potting mix, plus you don't have to wash and sanitize all those same little pots after plantout, which saves time overall. And making soil blocks cures winter gardening blues by using pent-up gardening energy in late winter when it's still too early to work in the garden. Here are the supplies and tools you need to invest in up front:
But from here on out, you're free. You'll never have to buy seedlings, trays, or any of the other "fancy" disposable cheap plastic stuff that the nurseries and big box stores try to sell you every spring, year after year.
The Biggest Advantage: "Air Pruning"
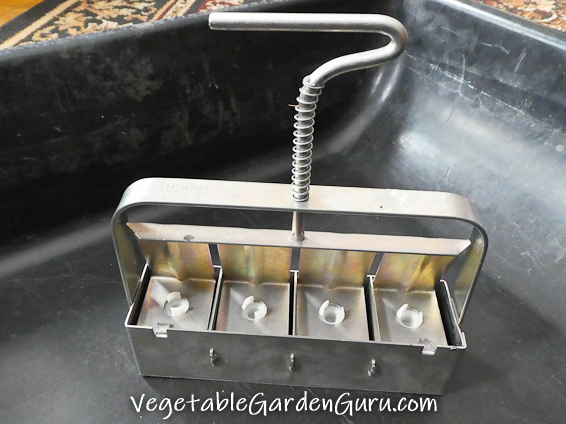
A soil block maker is a very cool metal form that has four or five (or even up to twenty, if you're a farmer) cube-shaped cells. You press the contraption down into a mixing tub filled with special recipe of sticky potting mix. Once you've packed the cells with the sticky potting mix, you lift it over to an empty tray and squeeze the plunger, which ejects perfect little 1 1/2" or 2" cubes. Each cube has a small depression in the top for planting a seed, which you then cover with a bit more mix. Because of the specific potting mix used, the cubes stand up by themselves without containers of any kind, and don't crumble apart even when you water them! The most obvious advantage to soil blocks is their sustainability. But they are also much better for seedling root growth. When the growing roots reach the edge of the block, they hit the air and just stop growing, instead of circling around. This is known as "air pruning". If roots hit a hard physical limit (like the side of a pot), they turn sideways and circle round and round, and never quite recover. The plant knows it's reached a hard limit, and it gets that stuck in its little head - and in its growth pattern - forever. Plants have their own intelligence, and if there is nowhere for the roots to expand, the plant will think it can never grow bigger and will metabolically switch over to flowering and producing whatever few seeds it can before it dies. Think of those tiny potted tomato plants already in bloom in April at Home Depot, which people snap up because they think "Yay! It's going to make tomatoes soon!". Which it will! But like a half-grown kitten that's pregnant before it's fully-grown itself, that plant will be stunted for life and will never be as productive or healthy as a plant with uninhibited roots that have not encountered a limit (the side of the pot). But with air pruning, as soon as you transplant your seedling out, the roots just start growing again, straight out and down as they would have if the seed had just been planted in the ground in the first place. The roots haven't given up, they've just stopped growing for a bit. Making Soil Blocks Requires a Special Homemade Potting MixUse the soil block potting mix recipe to make soil blocker mix. Peat moss was used in the original "Eliot Coleman" recipe (from his book The New Organic Grower), but peat is a non-renewable, unsustainable resource so for sustainability reasons I now use coconut coir (pron. "COY-er") instead. It's ground up coconut husks and is a byproduct of coconut processing. It comes in compressed bricks available at bigger garden centers and nurseries.Soil Block Potting Mix:
You'll need a a mixing tray of some sort - I use a 10-gallon mixing tub from Home Depot. You're also going to need trays to set the soil blocks in. You can use a cafeteria tray, a "1020" seed flat (the kind without holes recommended), or even a piece of rigid plastic, like the lid to a storage box. I like to use extra-heavy duty 1020 trays. Mix the ingredients together with your hands, and add water until it is about the consistency of brownie mix. It should be wet enough to stick together but not be soupy. Don't make a huge batch your first time through, so you can get the feel of the consistency that works best. Press the block maker down into the mix firmly, slide it up the side, move it over to the tray, set it down, and squeeze the handle to dispense the blocks into the tray. If you want to buy a soil block maker and try this out yourself, you can visit the soil blocker page here: Soil Block Maker and buy one through there from Gardener's Supply Company. (Yes Virginia... I would get a commission).
Spring is coming soon (I hope!)
DedicationVegetable Garden Guru is dedicated to the renewal of regenerative, sustainable, organic vegetable gardening around the world. May we become gardeners of healthful, nutrient-dense food, careful stewards of soil, and may the plants we tend remind us to always keep growing toward the Light.
|
| Back to Back Issues Page |

